Tuesday, April 2, 2013

What is Hibernate ?

What is Hibernate ?
  1. Hibernate is an  open source java based library used to work with relational databases. 
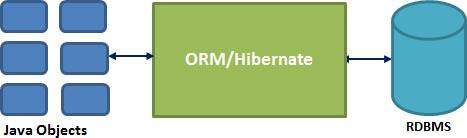
  2. The term Object/Relational Mapping refers to the programming technique for converting data between relational databases and object oriented programming languages such as Java, C# etc.
  3. It is a very powerful ORM solution build on top of JDBC API.
  4. It was initiated by Gavin King in 2001.
  5. It is a persistence framework which is used to store and retrieve data from database. It is a powerful, high performance Object-Relational Persistence and Query service for any Java Application
  6. Hibernate  makes use of persistent objects called POJOs (Plain Old Java Objects).
  7. Hibernate maps Java classes(POJO) to database tables and from Java data types to SQL data types and relieve the developer from 95% of common data persistence related programming tasks.
  8. These objects works as a data carrier called DTO (Data Transfer Object). They are used to carry data between different layers.


Hibernate Position

Advantages of Hibernate :

  1. Hibernate takes care of mapping Java classes to database tables using annotation or XML files. You don't need to write any code to map it.
  2.  It provides simple APIs for storing and fetching Java objects directly to and from the database.
  3. If there is change in database or in any table then the only need to change XML file properties. and Java classes which are related to the table.
  4. No need of SQL knowledge, you just need to work on familiar Java data types.
  5. It does not require an application server to operate.
  6.  Reduce database access complexity by easy fetching techniques.
  7. It has easy and simple query for data access.
  8. It is layers architecture and you can use the components as per your application need.
  9. Hibernate is database independent and you can use any database of your choice. It supports all major RDBMS like HSQL Database Engine, DB2/NT, MYSQL, PostgreSQL, FrontBase, Oracle, Microsoft SQL Server, Database,  Sybase SQL Server,  Informix Dynamic Server.
  10. It also provide caching framework that works with Hibernate. You can use any one in your application to improve the performance of your application.

 Hibernate Architecture :

The figure given below represents the architecture of Hibernate :


Hibernate framework uses various existing Java APIs, like JDBC, Java Transaction API(JTA), and Java Naming and Directory Interface (JNDI). JDBC provides a rudimentary level of abstraction of functionality common to relational databases, allowing almost any database with a JDBC driver to be supported by Hibernate. JNDI and JTA allow Hibernate to be integrated with J2EE application servers.

Below are some definitions of the object depicts in above diagram :
  • Persistent Object : These are short-lived, single threaded objects containing persistent state and business function. These can be ordinary JavaBeans/POJOs. They are associated with exactly one Session. Once the Session is closed, they will be detached and free to be used in any application layer (for example, directly as data transfer objects to and from presentation).
  • Transient Object : Instances of persistent classes those are not currently associated with a Session. They may have been instantiated by the application and not yet persisted, or they may have been instantiated by a closed Session.
  • Configuration (org.hibernate.cfg.Configuration ): The configuration of Hibernate is handled by the instance of org.hibernate.cfg.Configuration . It is the first Hibernate object you create in any Hibernate application and usually created only once during application initialization. It represents a configuration or properties file required by the Hibernate.
    Configuration cfg = new Configuration()
  • SessionFactory (org.hibernate.SessionFactory ) : Session factory is a thread safe, immutable cache of compiled mappings for a single database. Configuration object is used to create a SessionFactory object. Only single instance of session factory is required for an application, so it is based on a singleton pattern. Typically SessionFactory is require for per database using a separate configuration file. So in case If you are using multiple databases then you would have to create multiple SessionFactory objects. The SessionFactory is heavyweight object so usually it is loaded at the start of the application.
    SessionFactory sessions = cfg.buildSessionFactory();
  • Session (org.hibernate.Session): The session object provides an interface between the application and data stored in the database. It is a lightweight object and it wraps JDBC connection. It is factory of Transaction, Query and Criteria. It holds a mandatory (first-level) cache of persistent objects, used when navigating the object graph or looking up objects by identifier.
    Session session = sessions.openSession(); 
  • Transaction (org.hibernate.Transaction): It is a single-threaded, short-lived object used by the application to 
    specify atomic units of work. It is Optional. It provides methods for transaction management.  
  • Query :  Query object use Hibernate Query Language(HQL) or SQL to fetch data from the database. 
  • Criteria : Criteria object are used to create and execute object oriented criteria queries to retrieve objects. 


Thursday, March 7, 2013

What is RPM and How to build your RPM?

Introduction

RPM (RPM Package Manager) is a popular utility for installing software on Unix-like systems, particularly Red Hat Linux. The name RPM variously refers to the .rpm file format.
It is an open packaging system available for anyone to use. It allows users to take source code for new software and package it into source and binary form such that binaries can be easily installed and tracked and source can be rebuilt easily. It also maintains a database of all packages and their files that can be used for verifying packages and querying for information about files and/or packages.

Design Goals

RPM provides the capability to install an entire application with a single command, to track the files it put on the system, and to remove those files by using another single command.
  • Make it easy to get packages on and off the system.
  • Make it easy to verify a package was installed correctly.
  • Make it easy for the package builder.
  • Make it start with original source code.
  • Make it work on different computer architecture

Terminology

RPM packages are provided as compressed archive files that contain one or more files, as well as instructions specifying installation information about those files, including the ownerships and permissions that should be applied to each file during installation.
The instructions can also contain scripts to be run after installation or before uninstallation. These package files are extremely convenient, they provide a single file that can be easily transferred between machines for installation rather than having to transfer each file to be installed. To help in installation and management, all package files are labeled with highly identifiable names.
Package files have four-part names, which typically look something like:
mxlcloudsso.2.4.18-3.noarch.rpm
The four parts of each name are separated from each other by dashes or periods. The structure of the package file name is
name-version-release.architecture.rpm where
name - > name of an application or package that the archive installs on the system version → version number of the software that is contained in the package file release → release of that version of the software the package file contains architecture → architecture identifies the system types for which the package file is appropriate

Building RPMs

When building RPMs, go through the following steps:
  • Set up the directory structure.
  • Place the sources in the right directory.
  • Create a spec file that tells the rpmbuild command what to do.
  • Build the source and binary RPMs.

The following sections provide details for these steps.

Setting up the directory structure

RPM requires a set of directories (as listed in below Table)in which to perform the build. While the directories locations and names can be changed, unless there's a reason to do so, it's best to use the default layout. Note that if you've installed RPM, the build directories are most likely in place already.

RPM directories

Directory
Usage
BUILD
The directory in which the sources are unpacked, and the software is built.
RPMS
Contains the binary package files created by the build process.
SOURCES
Contains the original sources, patches, and icon files.
SPECS
Contains the spec files used to control the build process.
SRPMS
Contains the source package files created by the build process.

The RPMS directory usually has a number of architecture-specific subdirectories, such as the following (on an Intel architecture system):
athlon, i386, i486, i586, i686, noarch.

By default, Red Hat Linux systems expect RPMs to be built in the /usr/src/redhat directory.

Warning:
Do not build RPMs while logged in as root as root can alter any file on the system. Mistakes in building packages can have serious consequences if you are logged in as root.

To build RPMs, At a minimum you need only two things:
  • source code in the SOURCES directory
  • spec file in the SPECS directory

 Placing your sources into the directory structure

The first thing we need to do in order to build a package is to place all the source file directly in the /usr/src/redhat/SOURCES directory. It will be easier if you create a tarball of the source you want to build and then place in the SOURCES directory.
The convention for these tarball files is package-version.tar.gz. For example:
myfile-1.17.tar.gz

Creating the spec file

The spec file is nothing more than a text file with a special syntax and having extension .spec. It defines all the actions the rpmbuild command should take to build your application, as well as all the actions necessary for the rpm command to install and remove the application.
The normal naming convention is to name the file with the package name and a .spec filename extension.
The following sections describe these spec file sections and the necessary syntax in each section.

Introduction section

The introduction section contains information about the package, the type of information.
Example :
  • Summary : This is a one line description of the package.
  • Name: This must be the name string from the rpm filename you plan to use.
  • Version : This must be the version string from the rpm filename you plan to use.
  • Release : This is the release number for a package of the same version.
  • Copyright : This line tells how a package is copyrighted.
  • Group : This is a group that the package belongs to in a higher level package tool or the Red Hat installer.
  • Buildroot : This line allows you to specify a directory as the "root" for building and installing the new package.
  • %description: This is a multi−line field that should be used to give a comprehensive description of the package.


prep section

This is the second section in the spec file. It is short for prepare, defines the commands necessary to prepare for the build. If you are starting with a compressed tar archive (a tarball) of the sources, the prep section needs to extract the sources. The prep section starts with a %prep statement.
For example:
%prep
%setup -q


build section

The build section contains the commands to build the software. Any sh commands can go here. It starts with a %build statement.
Example:
%build
./configure CXXFLAGS=-O3 --prefix=$RPM_BUILD_ROOT/usr
make

Install section

The install section holds the commands necessary to install the newly built application or library. In most cases, your install section should clean out the Buildroot directory and run the make install command. The install section starts with an %install statement.
Example:
%install
rm -fr $RPM_BUILD_ROOT
make install

Clean section

The clean section cleans up the files that the commands in the other sections create, It starts with a %clean statement. %clean
rm -rf $RPM_BUILD_ROOT


Files section The files section lists the files to go into the binary RPM, along with the defined file attributes. It starts with a %files statement
Example:
%files
%defattr(-,root,root)

Sample

While working on one of my project, Once there was a requirement where I have to deploy the tomcat, place the war into the tomcat at the appropriate directory and also start the tomcat on the client machine using rpm.
To achieve above task, I went through the following steps;
  1. Created RPM build directory structure.
  2. Placed our tar file into SOURCE directory.
  3. Spec file into SPEC directory
I have uploaded the rpm structure on the https://github.com/abdulwaheed18/redhat with spec file and tar file. You can refer it for better understanding.
Note : For security purpose, while creating tar I have removed the war file. So to make it working,
Download the tar file from SOURCES, untar it and then add your war file with name “mxlcloudsso.war” and tar it again and place into SOURCES directory.


To build the rpm :
rpmbuild -ba $redhat/SPECS/mxl_installer.spec
The rpm file will get created under $redhat/RPMS/noarch directory structure.


To install the package:
rpm -i mfe-cloudsso-sl-installer-1.0.0-1.noarch.rpm
It will install the tomcat on your machine, deploy your war file in tomcat ,start the tomcat.


To remove the package:
rpm -e mfe-cloudsso-sl-installer
Note : To remove the rpm, We just need the package name.

Useful command :

To build RPMs with the rpmbuild command, use the following basic syntax:
rpmbuild -bBuildStage spec_file
The -b option tells rpmbuild to build an RPM. The extra BuildStage option is a special code that tells the rpmbuild command


Option
Usage
-ba
Build all, both a binary and source RPM
-bb
Build a binary RPM
-bc
Build (compile) the program but do not make the full RPM, stopping just after the %build section
-bp
Prepare for building a binary RPM, and stop just after the %prep section.
-bi
Create a binary RPM and stop just after the %install section
-bl
Check the listing of files for the RPM and generate errors if
the buildroot is missing any of the files to be installed
-bs
Build a source RPM only


References:

http://fedoraproject.org/wiki/How_to_create_an_RPM_package
http://www.ibm.com/developerworks/library/l-rpm1/


Thursday, February 21, 2013

How to integrate Web Application with Salesforce via Oauth

This tutorial shows you the basic of Oauth. We have created a Java Web Application that authenticates the user to salesforce via Oauth 2.0 and then we have performed few CRUD operation via the new API.

Setup:

  • SSL enabled Tomcat Server as we have deployed our Web Application on tomcat. Click here for instruction on How to enable SSL on apache Tomcat 7.0
  • Salesforce Remote Access Application. Click here for instruction on How to create Remote Access Application on Salesforce?
  • Download the application from here and change the name to Services.

Run the Project:

Check out the project from the above URL, import into the eclipse and Run as a Server.

Navigate your browser to https://localhost:8443/Services. You will see the following page:


Click on the link and it will take you the salesforce page for Authentication :


Once you are login into salesforce, It will ask you to allow the Oauth_Apps to access your data:


After clicking on “Approve”button, You will see the below page with few CRUD operation output :


Note : You have provided your credentials to the salesforce.com website not to the requesting application. This is Oauth in Action. Once you are authorize accessing to your data, The control will return back to your application with salesforce.com generated token using which you can interact with the salesforce data.

Code Description:

OauthServlet.Java

In the Servlet initParams, We have defined the clinetSecret, clientId and the redirectUri, You can change it as per your remote application.
@WebInitParam(name = "clientId", value = "3MVG9Y6d_Btp4xp5hntckvnA5QVKsxlc4RUx9CbJndYCQQS4oO7jHAVspS0WdeCXBJlMXO1e9hwQSCjCBB71H"),
// clientSecret is 'Consumer Secret' in the Remote Access UI
@WebInitParam(name = "clientSecret", value = "4518803906379506686"),
// This must be identical to 'Callback URL' in the Remote Access UI
@WebInitParam(name = "redirectUri", value = "https://localhost:8443/Services/OAuthServlet/callback"),
@WebInitParam(name = "environment", value = "https://login.salesforce.com"), })

Here our Java Web Application act as a third-party website or termed as “client” which operate on behalf of a user. It first sends the request to salesforce.com which authenticates the user, obtain the user's authorization(i,e Approve/Deny page) and issues an access token which client can use while interacting with the resource server I,e salesforce instance.


When the Servlet initializes, it constructs authUrl, to which it redirects the user to authenticate and authorize access to data:
try {
authUrl = environment+ "/services/oauth2/authorize?response_type=code&client_id="
+ clientId + "&redirect_uri="+ URLEncoder.encode(redirectUri, "UTF-8");}

The authUrl contains the configuartion which identifies the salesforce remote application.It also creates the tokenUrl which it uses to obtain the access token.
The response.sendRedirect(authUrl) authenticates the users, obtains authorization for the web app to access the user’s data(first time) and then redirects the user back to redirectUri: https://localhost:8443/Services/OAuthServlet/callback


When control returns to the Servlet, we use the returned data to build a POST request and send it to tokenUrl and we get the response(access token and instance Url) from authorization server in JSON format.

TestApi.java

As we have access token, Here we have just perform few CRUD operation i,e showAccounts, createAccount,deleteAccount and updateAccounts. In every HttpClient calls, we set a request header, Authorization to the value OAuth, followed by a space, and the access token. It is essential to do this for every interaction with the REST API; failure to do so results in a 401 ‘Unauthorized’ error when submitting the request.

Summary:

The application demonstrates how to authenticate and retrieve an access token using Oauth 2.0 and how we can do perform CURD operation with the help of access token.

References:

http://oauth.net/2/
http://wiki.developerforce.com/page/Getting_Started_with_the_Force.com_REST_API

Monday, February 4, 2013

How to create Remote Access Application on Salesforce?

Before I'll start with how to create Remote Access Application. First let me explain what is actually Remote Access Application.

What is Remote Access Application?
A remote access Application is an application external to salesforce that uses the Oauth protocol to verify both the salesforce user and the external data. All remote access applications have been integrated with salesforce, such that they can access a subset of your salesforce data once you explicitly grant each application permission.

How to create Remote Access Application?

To create an Remote application, You must have your developer account, If you don’t have it then You can create it from here.

Step to create your First Remote Access Application:
  1. Login to salesforce.com then click Your Name |Create | Apps and click on “new” button. Check below screenshot :
      

    When you click on new button, you will see a page like this:


  1. Enter the name of the Application. This is required.
  2. Enter the specify Callback URL which is also required. It represents the URL that the user will be returned to after they approve access for the application. Mostly It uses HTTPS protocol.
  3. Enter your Contact Email. Contact Email is required.
  4. Now Save the Remote Access Application.
Once you saved the application you will get the generated consumer key and consumer secret as shown below:


Note : Later, If you change the name of the application, the consumer key and consumer secret are not regenerated. It will be same as it was generated on the first time.
 
Congratulation!!! You have created your first Remote Access Application.

Friday, January 18, 2013

What is Maven repository ?

Maven Repository :


A repository is a place where all the project jars, library jar, plugins or any other project specific artifacts are stored and can be used by Maven easily.

There are three types of repository :
  •  local
  • central
  • remote 

Local Repository :


The maven local repository is a local folder that is used to store all your project’s dependencies (plugin jars and other files which are downloaded by Maven). In simple, when you build a Maven project, all dependency files will be stored in your Maven local repository.

The default name of the Maven's local repository is .m2.

Central Repository

Maven central repository is repository provided by Maven community. It contains a large number of commonly used libraries.

When you build a Maven’s project, Maven will check your pom.xml file, to identify which dependency to download. First, Maven will get the dependency from your local repository, if not found, then get it from the default Maven central repositoryhttp://repo1.maven.org/maven2/

This repository is managed by Maven community, required to be configured and it requires internet access to be searched.

Remote Repository


Sometime, Maven does not find a mentioned dependency in central repository as well then it stopped build process and output error message to console. To prevent such situation, Maven provides concept of Remote Repository which is developer's own custom repository containing required libraries or other project jars.

For example, using below mentioned POM.xml,Maven will download dependency (not available in central repository) from Remote Repositories mentioned in the same pom.xml.
<repositories>
<repository>
<id>JBoss repository</id>
<url>http://repository.jboss.org/nexus/content/groups/public/</url>
</repository>
</repositories>

Maven Dependency Search Sequence :

When we execute Maven build commands, Maven starts looking for dependency libraries in the following sequence:

Step 1 - Search dependency in local repository, if not found, move to step 2 else exit.
Step 2 - Search dependency in central repository, if not found, move to step 3 else exit.
Step 3 - Search dependency in remote repository or repositories, if not found then it is prompt error message else exit.

Wednesday, January 9, 2013

how to install MAVEN on linux

What is MAVEN ?

Read here : http://maven.apache.org/

Here are the steps to download and install Maven on linux :

Step 1 : Download the latest binary from the http://maven.apache.org/download.cgi.
             apache-maven-3.0.4-bin.tar.gz
Step 2 : Untar it using tar command.
              tar -zxvf /usr/local/apache-maven-3.0.4-bin.tar.gz
Step 3: Add Maven binary Path to the System Path i,e add in .bash_profile path
          $ cd $HOME
          $ vi ~/.bash_profile
Set PATH and M2_HOME as follows
M2_HOME=/usr/local/apache_maven-3.0.4
PATH=PATH=$PATH:$HOME/bin:/usr/local/apache_maven-3.0.4/bin
save the file by pressing esc : wq button

Note: Don't delete the previous PATH, Just append the M2_HOME path after :

Now save and close the file then logout and login back to see the effects, To confirm where the installation has done properly or not, check :
mvn --version
you will see following ouput :
Apache Maven 3.0.4 (r1232337; 2012-01-17 00:44:56-0800)
Maven home: /usr/local/apache-maven-3.0.4
Java version: 1.7.0_10, vendor: Oracle Corporation
Java home: /usr/local/jdk1.7.0_10/jre
Default locale: en_US, platform encoding: UTF-8
OS name: "linux", version: "2.6.18-92.el5", arch: "amd64", family: "unix"


Congratulation... you are done here  :)


Wednesday, January 2, 2013

How ExceptionHandler return JSON in spring MVC

I am working on one project where client/server response is in JSON format. It is easy to send object in JSON format but what if some exception occured and you want to send the Exception also in JSON format ?
After n number of trial. I finally able to do the above task

Step 1 : Add following annotation "AnnotationMethodHandlerExceptionResolver" in your <CONTROLLER>-servlet.xml file.


<!-- JSON format support for Exception -->
    <bean id="methodHandlerExceptionResolver"
        class="org.springframework.web.servlet.mvc.annotation.AnnotationMethodHandlerExceptionResolver">
        <property name="messageConverters">
            <list>
                <ref bean="jacksonMessageConverter" />
            </list>
        </property>
    </bean>

    <bean id="jacksonMessageConverter"
        class="org.springframework.http.converter.json.MappingJacksonHttpMessageConverter"></bean>


Step 2: Make sure you have added jackson jars into your classpath.


Step 3: In controller class :


    @RequestMapping(value="/test", method = RequestMethod.GET)
    @ResponseBody
    public String toTest() throws MxlServiceException {

   try {
      int i = 10/0; // it will throw exception which will be caught by handleException(...)
  }catch (Exception e) {
    throw e;
   }
             return "hello";
 }


then catch them both by writing an exception handler that looks like this:

@ExceptionHandler({ Exception.class })
  @ResponseBody
    public ErrorResponse handleException(Exception ex,
            HttpServletRequest request, HttpServletResponse response) {
             response.setStatus(HttpServletResponse.SC_BAD_REQUEST);
        ErrorResponse errorResponse = new ErrorResponse();
        errorResponse.setMessage(ex.getMessage());
        return errorResponse;
    }


Output:

{"message": "your_message"}


Feel free to comment :)


How TOPT Works: Generating OTPs Without Internet Connection

Introduction Have you ever wondered how authentication apps like RSA Authenticator generate One-Time Passwords (OTPs) without requiring an i...